Motorbike Chain Cleaning

The first thing I’ll say is this: do not, under any circumstances, put the bike into first gear and start the engine. Just don’t do it.

For some reason people get fixated on the chain running under the scrubbing brush and think that this is a good idea. I’ve done it. Most bikers have at some point or other, and then we have a near miss and rapidly learn to never do it again. In my case the brush got yanked out of my hand. I wasn’t holding a rag onto the chain, and I was lucky. A lot of people lose tips or joints off their fingers or thumbs. Some people lose their hands. I’ll say it again: never run the engine while you’re cleaning the chain. Run the chain by turning the back wheel by hand.

I tried a few different methods over the years, with varying results:

  • Taking the chain off the bike, immersing in kerosene, and scrubbing with a dish brush. I scrubbed the sprockets as well. Brilliant results but it’s hard work.
  • Buying a cheap fluffy bath towel and scrubbing by hand, wearing gloves and soaking the towel in kerosine. It did a fantastic job on the outside of the chain but didn’t touch the areas inside the links. Also hard work.
  • Using a clip-on driven brush scrubbing machine, made by Muc-Off, with their proprietary degreaser. Horribly expensive, with indifferent results and toxic chemistry everywhere. The brush machine was badly designed and didn’t touch the flanks or insides of the chain. Of course it did little or nothing for the caked-on gunk on the sprockets. This experience was so disappointing that I’ve never bought Muc-Off again.
  • Scrubbing the chain on the bike, with kerosine, an old dish brush and a stainless steel bowl to catch run-off. Hard work, the outside of the chain and the rear sprocket cleaned up beautifully, the inside faces of the chain links were hard to get to, and the front sprocket couldn’t be cleaned. I also had to wipe kero and sprayed dirt off frame, tyre, wheel rim and bodywork afterwards.

There is an odd-looking brush that you can buy – it features two sets of bristles set at 90 degrees, facing each other. It’s ridiculously expensive for what it is. I couldn’t see this being any better than anything else I’d tried, since I already knew that brushing tends to spray dirt, oil and solvent all over the rest of the bike.

I spent a while thinking about this and then trialled a different idea – spraying kerosene onto the chain and rear sprocket via a car’s windshield washer pumps and nozzles, with a shroud to catch overspray.  The unit would be positioned on a car’s scissor jack.  I built a rough prototype and tried it.IMG_6722

IMG_6723

It took a while to get it ready and it didn’t work. The chain and sprocket kept jamming in the shroud, the jets were impossible to aim, and I got kero over everything. But that’s prototyping – this kind of thing is progress, it just doesn’t feel like it. I sat down, had a think, and realised that the jets actually did work. The answer was to go low-tech and simple instead of building a dedicated machine. What mattered was the method, not the hardware.

So I tried this: garden spray bottles and a tray under the rear wheel. No brushes, no scrubbing, I agitated the dirt using only the jets from the bottles. No kero either: I went with citrus-based degreaser, something that could be ethically disposed of in my laundry sink. I sat at the back of the bike, turned the rear wheel by hand with the bike up on a centerstand, and sprayed degreaser onto sprocket, hub, chain, swingarm and chainguard. I waited the recommended time and then used a pump-up watering bottle to wash the bike down again, getting the jets into everything both times. The tray caught the bulk of the run-off. I towelled up the rest. I then dried the bike off by putting it out into the sunlight and fresh air (use a dehumidifier if you’ve had to do this at night) before re-lubing the chain.

Total working time was about an hour, but I went over the chain several times with the degreaser-rinse cycle. The old lubricant had done the thing where it had aged and turned into tar. If I did this regularly (i.e. once a month or so) then I can see this getting to the point where it’s half an hour or less, with only one degrease and rinse cycle needed. This could be done as part of a regular bike wash, with one hose rinse afterwards for everything.

The spray method also means that it’s possible to clean out the front sprocket. Take the cover off, gouge out the worst of the clumped dirt with a screwdriver, and have at it. I’d recommend using kero for the first time you do this (the rest of the chain and rear sprocket included) since it really does take the tar-gunk off, but once you’re into regular cleaning cycles then water soluble solvents should get the job done without problems.

A quick note on solvents: the reason I used kerosene is because kero leaves a thin oil film, is a lubricant in its own right, and doesn’t attack rubber. Turpentine is a more aggressive degreaser but can attack rubber, possibly cracking the O-rings.

A mate’s bike had an O-ring on the chain break and fall off. I hadn’t realised this before, but the little rubber rings function as mechanical spacers. Without that O-ring, the chain developed a kink and then started hitting the sprockets with the side plates on the affected roller. It rapidly wore into the kinked position and got to the point where I thought it was going to bind and then snap. Very dodgy. The whole lot then had to be replaced… granted, it probably wasn’t cleaned at all, let alone with turps, but it shows that it’s worth looking after those little rubber seals.

The degreasers developed for bicycles are similar in regards to their not damaging anything. The (western, first world) cycle crowd these days are monied, fussy and very well connected via the internet. There’s a lot of passion going around. Technical advancements have been rapid. The most sophisticated cleaning products are therefore found in bicycle shops, not in automotive places. Any product that hurt tyres, bearing seals or paint would rapidly be damned via the internet and then disappear from the marketplace.

It is possible to buy very active degreasers from auto shops. The idea is simple enough, you spray them on, with cardboard or newspaper underneath to collect the runoff, then wrap the paper up and chuck the stinking mess into the bin. I don’t like them. Fumes, fire risk, and ecological impacts are all unacceptable as far as I’m concerned. I also don’t like the way that they get dirt moving only for as long as they don’t evaporate. Anything that doesn’t drop off just ends up being deposited back on again. I will say that they do work on really thick collections of oil-caked muck, but then if the vehicle was cleaned regularly, this wouldn’t be a problem anyway.

Scrubbing with a brush is also something I’m trying to move away from. I believe that it’s popular because it yields results while you work – you can see what your effort is doing. The problem with it is that if your brush can’t reach it then you can’t scrub it. You can also end up pushing dirt into crevices, like chain o-rings, for example.

The jets get into corners, don’t tear up the chain seals, and carry dirt away. The bottles were about five dollars each and store easily, even with solvent still in them. The best bit of the job was finding my chain dry and unrusted in the morning, with an ideally thin film of lubricant still present. The method worked. The next thing I’ll try doing is finding a method to relubricate the chain, but without the excess lube that spraying straight from the can tends to leave.

Repacking Bike Mufflers

My Ducati (a 1995 Supersport 900SS) had an awesome sound, but a number of problems. It ran horribly at low revolutions, jerked and started at low speeds, and ran out of puff quite abruptly when accelerating hard above 5000 RPM. It fouled spark plugs continually and also backfired, since it was running rich. Also the sound was so awesome that at times I found myself in physical pain while riding, earplugs or not.

After a long time fiddling with the carburetors, I finally decided that I’d gone as far as I could there and it was time to look elsewhere for the fault. The workshop manual had a single line in the section devoted to carburetion: modified exhaust systems may affect the running of the engine.

The previous owner had told me that he’d had the mufflers de-baffled. The other bikes I’d heard had sounded a lot quieter. Taking the mufflers apart was simple, just take them off the bike and then drill the rivets at the ends out. It was time to investigate, and what I found is pictured below:

This was quite a surprise. I’d had a mental picture of a welded can of plates, tubes and baffles, with metal baffle plates removed via angle grinder. Some reading and I found out that there are two main types of muffler – resonance box (with baffle plates, helmholz resonator boxes, and flow passages), and absorbers (with a simple perforated tube surrounded by packed sound-absorbing material). Absorber mufflers are associated with high-performance engines, due to their inherently free-breathing qualities. They put out a characteristic deep bass sound, and performance characteristics are largely dictated by the mass of packing inside the muffler casing. The usual story is that the more packing there is, the better they go. In my reading, I found that a standard trick in motorcycle racing is to go to track with up to four sets of mufflers and to weigh them after each race, changing or repacking as needed before the next race. This can make a difference of 1 – 2 %, in terms of performance and power output, and in racing that can be the difference between podium and pack.

I certainly hadn’t expected to see that the ‘de-baffling’ was just removing three quarters of the original high-quality packing material and then wiring the remainder on so it didn’t bounce around. Very much a standard Kiwi trade job.

Cheap. Nasty. Not impressed. I bought a box of generic fibreglass muffler packing, which looked like this:

The remaining original packing and the wiring was taken off. I spent a while scrubbing everything with degreaser to get most of the carbon buildup off, then I got geared up. Glasses, gloves, overalls (I should have had a respirator mask, too – particulates in this stuff are nasty), and got to stuffing the wooly, soft, pillowy fibreglass in. The technique which I found worked best was to get it most of the way there, nearly close the muffler up, and shove as much stuffing as possible in through the narrow gap remaining with a steel ruler or similar instrument. I managed in the end to get nearly 500g of packing into each muffler.

I re-riveted the ends to finish. I debated installing some kind of threaded fastener, but decided against it. Carbon, heat, and oxidation probably meant that rivets were used for a reason – removing them just meant drilling them. Screws would probably lock themselves into place permanently in a month or two of riding.

The repacking has transformed the bike. Acceleration is smooth and progressive to peak power at 6500 RPM, where it gracefully falls off again to redline at 9000 RPM. The bike is running smoothly at low revs and low speeds again too. The exhaust note has quietened to a level where riding in residential areas is actually possible without earplugs, and my mates are giving me some stick about that. One of the guys was nearly crying when I told him that I was going to re-baffle the mufflers, but I would never go back. It’s running that much better, and this is one of the best jobs I’ve ever done on the bike.

Camera Repair: Horizon S3 Pro Banding Fix

Horizon S3 Pro Banding Fix

Shortly after I bought the S3 and started shooting with it, the dreaded banding issue started – first at 1/30th, then 1/15th. It finally reached the stage where going to the faster speeds didn’t get rid of it.

I set out to fix it and in the process nearly destroyed my camera. Unfortunately it’s not obvious to the novice as to how the camera works. What follows is a procedure for eliminating the fault, together with pitfalls to avoid.

The Short Version:

  1. Take the casings off the camera.
  2. Remove the brass clockwork speed control module.
  3. At the base of the lens turret, there is a gear wheel with two oval slots cut into it. There are two very soft rubber bushings there. Remove and replace these with tighter rubber bushings.
  4. Reassemble and go forth to a glorious banding-free future.

The Long Version:

Set a clean, fluff-free towel down on the working area. Get decent lights set up.

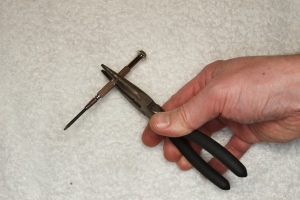
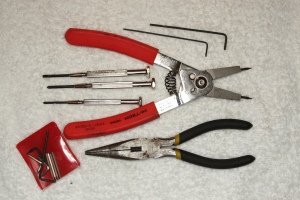
Tools: jeweller’s screwdrivers, tweezers or fine pliers, long nosed pliers with linear serrations on the jaws, parallel points optical spanner or very fine circlip pliers.  The Allen keys are there because I’d changed some screws.

IMG_6744

If a screw needs torque to undo, a useful technique is to steady the base of the screwdriver and apply torque via the serrations on the screwdriver body and the jaws of the pliers.

IMG_6746

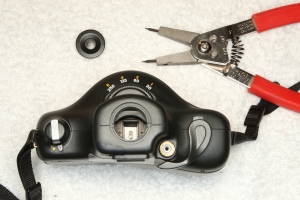
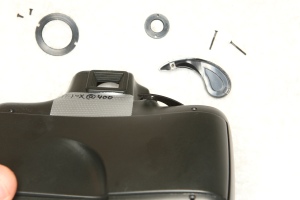
Set the camera on its base. Use the optical spanner or circlip pliers to unscrew the bubble level in the top of the casing. Remove and set aside.

IMG_6754

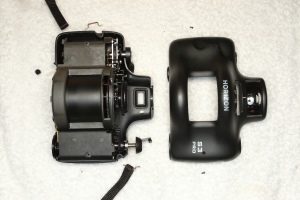
Set the camera on its back. Unscrew the two phillips screws holding the front of the casing in place. Fully depress the film rewind button in the camera base, using a screwdriver to latch this under the casing. Pull the front casing half off, and then remove the pins for the neck strap and remove this as well. Set the film rewind’s plastic plunger somewhere safe – it is easy to drop and lose this.

IMG_6755IMG_6751

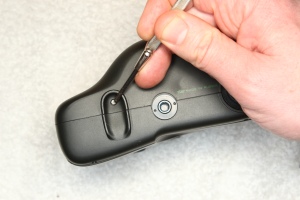
Set the camera on its face. The plastic cover for the film advance lever is held on by a single screw underneath, at the lever tip. Unscrew this, remove the plastic cover, set the cover aside with the screw. No matter how tempting it is, or practical it looks, do not attempt to unscrew the metal film advance lever from the film advance shaft. The screw holding it on will break rather than come out.

Remove the four phillips screws holding the back casing on.IMG_6752

Use the circlip pliers or optical spanner to remove the normal tripod mount and the handgrip mount. Now here’s where it gets tricky…IMG_6766

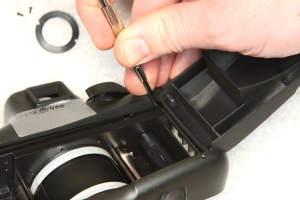
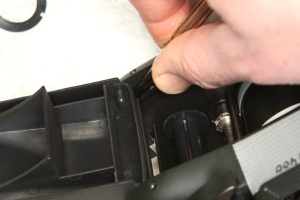
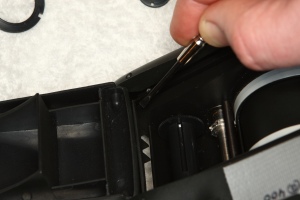
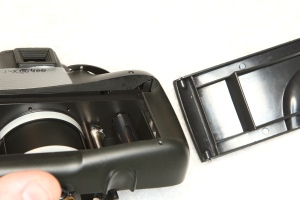
Release the film door latch, by pulling the rewind lever up. Holding the camera upside down, move the casing a little outward from the back base, leaving it in place at the camera top. Using a screwdriver to flex the plates holding the film door hinge pins, release the film door.  These plates are black, inside a black casing, tucked into a corner.  You may have to get right into the corner with a penlight to see them, but they are accessible.

 IMG_6765IMG_6763IMG_6762IMG_6769

Pulling the back case outward from the left of the camera, see if you can work the film door free. Don’t be shy about flexing the case a little, the plastic can handle a reasonable amount of force. I removed mine by taking the door hinges to the middle of the opening, slightly twisting the film door, and popping the hinges out that way.  Note that there’s nothing holding the hinge pins in place on the door itself and these can easily drop and be lost.   Keep the door above the towel at all times so if they do drop, they don’t go far.

You don’t have to fully remove the back casing (this is very tricky to do and involves flexing the plastic around the shutter release button rather hard).  It’s possible to push the casing back and out of the way:

IMG_6777

You don’t have to remove the handgrip mount, but it does make life easier with removing the speed governor module.

IMG_6778

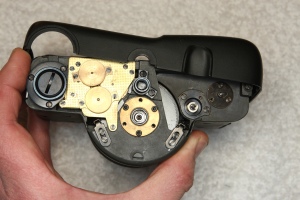
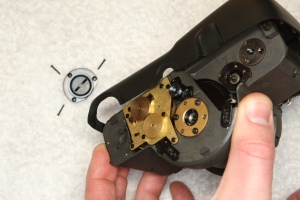
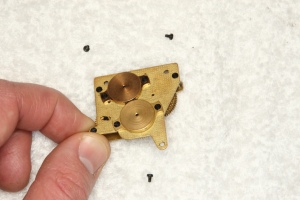
Take care to avoid screws holding the two brass plates together. Unscrew the three mounting screws only and then remove the brass assembly. This module is the mechanical speed regulator for the camera, using two centrifugal brakes to control the turret’s rotational speed. One of these brakes is on an additional pair of spur gears and can be switched in and out, in order to provide the slow set of shutter speeds.

IMG_6780IMG_6785

There may be some oil present. This is normal – the banding fault is not caused by this module, unless there is clearly damage or dirt present.

Do not attempt to dismantle or remove:

The two plastic dials at the top of the turret for shutter speed and aperture. You don’t need to touch this assembly, and again, the narrow fastener holding these on appears to be locked on.

The film winding mechanism, including the wind-on lever on top and the lever stop at the camera base. The two screws at each end of the main shaft are effectively locked into place and will break just under their heads rather than come out. Break either of them and you’ve effectively ruined the camera.

The film winding mechanism itself. If for any reason the camera isn’t winding on far enough, or won’t release after winding on, suspect the little folded timing trips on top of the turret first.

The timing trips on top of the lens turret. These are not at all obvious as to what goes where – there aren’t outlines marked, or numbers stamped, or any guides to help with putting them back on. If you for any reason take these off, take photos before, during and after.

The centrifugal braking mechanism. If in doubt about oil or dirt, washing via solvent in an ultrasonic bath or by repeated immersion and running gears while assembled is the way to go. Allow to dry and relubricate with watch oil before refitting.

The round brass disc with six screw holes, held in place by three screws, at the base center of the turret. There is a bearing visible in its center. This tensions the helical spring which drives the camera, and unscrewing this will allow this spring to unwind, thus turning this brass disc at high speed. It’s then a matter of guesswork trying to figure out how many turns to put on it, and searching your entire lounge for the last remaining tiny black screw that it has slung out when it released. Like I said, pitfalls for the unwary.

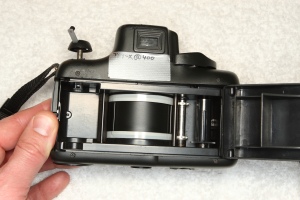
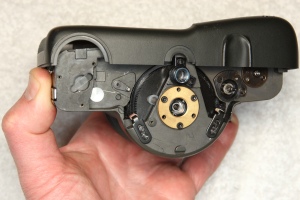
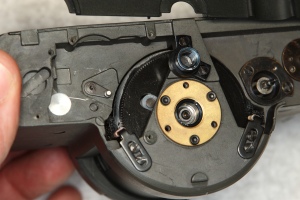
And now to the good bit… here’s where the banding fault is located. There’s a gear wheel visible at the base of the lens turret. It’ll only be accessible once the centrifugal braking module is removed. This gear wheel has two oval slots cut into it, one on each side. There is a driving pin in each slot, cushioned against shock by a cylindrical rubber bushing.

IMG_6786

The bushing in this photo has already been replaced – this is the white element beside and just under the round brass disc.  The rubber bushings are small and soft enough to permit torsional vibration of the turret against the centrifugal clockwork brakes during exposure, and this is where the banding problem comes from.

Using tweezers and a fine screwdriver, pull the near side of the rubber bushing up, then draw the entire bushing out.

Cut a new bushing from appropriate sheet rubber stock, or rubber tube. Dimensions are: Pin diameter 2.8 mm, outer diameter 5.2 to 6 mm (depending on how hard the rubber is, and how much you want to reduce the turret bounce), length 3mm. I tried fitting some white silicon rubber, cut from tubing, with a 6mm OD.

Somehow get these new bushings over the turret drive pins and stuffed into place in the gear wheel’s slots. Working the gear wheel up and down will help with this.  There are two bushings, set 180 degrees apart.  You will have to wind on to get at the second one.  Take care if you release the shutter, the turret will swing at considerable speed and then stop with a bang.  Control the turret’s motion by holding it.

Re-fit the centrifugal brake module and take the chance to test the camera.  Note that the gear selector should be on the faster shutter speeds when you do this (select at camera top).

Shutter Speeds: A quick way to test the shutter speeds is to look at the time needed for the turret to rotate on the slower gears – this time should be roughly 9.2 seconds. If it’s running slowly, clean and lubricate the centrifugal gear mechanism, or increase tension on the main turret spring. This is done by (carefully) removing two of the three screws holding the central brass disc at the base of the turret, then loosening – not removing – the third. This will let you feel the tension, its direction, and its strength. Holding the brass disc still, remove the last screw, change tension as suitable, refasten the plate.

Shutter Release: this can become intermittent or even jam if the little timing trips on the top of the camera aren’t making proper contact with the right parts of the winding/release mechanism. The fix for this, perversely, is at the base of the camera. There’s a hollow nut fastener, apparently holding the turret bearing in. This seems to set the turret height, but it isn’t locked in place by anything, and it may have worked its way loose and unscrewed. If this happens, the turret will sit low, the trips won’t work properly, and the camera may develop an incredibly annoying problem with locking up after being wound on. I’d suggest using a low-strength threadlock if this has happened.

Shutter Curtains: There’s a pair of brass spring-plate trips on the turret top which adjust these, together with their respective timing trips. Their purpose is to make sure that the shutter curtains are closed in one direction, open in the other. A few open exposures should confirm that these are working properly, if not, adjust as suitable.

Check and clean the gears. The gears at the top of the camera are for winding on, and are meant to run freely during an exposure. They can affect shutter speeds if there’s grit caught in their teeth, though. The gear train at the camera base controls turret rotational speed and therefore exposure, via speed up spur gear pairs and centrifugal braking. If you’re having single or irregular bands on exposures (at all speeds), then give these gears a thorough clean (I’d suggest with a new toothbrush) and relubrication. Note that these bands will happen in the same place repeatedly if it’s a problem with the top gearing, but may move around or appear / disappear if it’s a problem with the base gearing.

Reassemble the camera. If you’ve got this far, then this shouldn’t be a big deal. I found that I had to fit the film door after the rear case of the camera, but otherwise, it was done by reversing the sequence above. Be sure that the front casing is edge-matched properly to the rear casing – this is a tight fit and may need careful pressing to get it to click into place. This has to be done before the front casing screws can be properly fastened home.

Done! Time to go shooting.

The Basics

The Basics of Home Garage

Before you do anything:

Work Area: You need a place where a vehicle can be left taken apart. The ideal is a spacious, well-lit, heated, ventilated garage with a locking door and a workbench. And a stereo. And maybe a beer fridge. The worst is the side of a busy road, with the wind blowing dirt or even sand around and various annoying nosey parkers trying to be funny. Get your work area sorted out first.

Lines of Supply: You will need a source of spare parts and a source of tools. Tool shopping should be done at a well-stocked local shop where you can see what you’re getting, but spares these days are best bought off the internet. Price competition, reliable third party manufacturers, and abundant information are your friends. Check your reviews and ask around for direct experience.

Tools: Buy as you need them, and buy quality. Go for six-point sockets – these are much less likely to burr rusted nuts than the more common twelves. Also, if a socket won’t properly fit onto a nut, stop the job and go and buy the one that will. A decent set of vernier calipers will help as well.

The main thing to keep in mind here is to avoid buying things for a need that might never arise. This starts happening when you buy it because it’s on sale, or because it’s pretty, or because you start thinking about what you could do with it in the future. Don’t buy like that. Buy a tool because either you need it now, or you’ve made do without it for a while and you keep on wanting it for the job at hand. The best tool you can ever have is spare cash in the bank.

Clean It First: It is much, much easier to work on vehicles when they are clean. Trust me on this, every hour you spend in cleaning it will repay itself twice over later on. Everything gets easier, especially dealing with gaskets and seals.

Be Prepared To Learn: I’ve been at this for around twenty years. I’m still learning. Nobody knows everything. Nobody could. Keeping an open mind and realising that you need to consider your methods is very important here – although one way of getting a job done may work, is it the best way? Be prepared to review and change how you do things as you go.

Manuals: Workshop manuals, parts manuals (especially those with exploded diagrams), tutorials from Youtube, articles on blogs, wherever you find them, get your hands on as much information as you can before you start taking things apart. Then have this information to hand, right in the work area. I have several binders where individual sheets of paper sit inside protective plastic covers – this has turned out to be a good way to avoid greasy fingerprints on my manuals and logs.

Tidy Up: Keep your work area as tidy and as uncluttered as you can, and be prepared to stop a job every now and again in order to tidy tools away. It’s faster. By the stage that you’re having to look for every tool you need, when everything you need to use is buried under something else, it’s well past time to tidy up before starting again. Keep it open and the job goes faster.

Junk: Once it’s junk, throw it out. Take time and do the work to do so. Give it away or sell it. Pay money to throw it away if you have to. Clear space is a tool in its own right. Obstacle courses of junk are liabilities. They make you work harder and can turn a basic job into a nightmare.

Keep Records: Keep a log of vehicle maintenance. I personally don’t worry about logs of expenditure or trip records, but I do find that carefully writing down the work I’ve done leads to ideas, or highlights things I don’t know yet.

Once that’s sorted out – all of it – then you can begin. Here are some specific tips – no particular order – based on experience.

Getting rusted fasteners off. Yep, old bolts rust on. They can be pretty stiff to remove… what happens is that when steel rusts, the oxide layer swells. This forms an effective threadlock. If the thing that the fastener is screwed onto or into rusts as well, then the two oxide layers grow into each other and form a cold weld. This weld can be stronger than the bolt itself, as I found when I snapped a few M6 studs off the car recently.

The first thing to do is to spray the fastener with WD40 or CRC5.56. Then leave it completely alone for at least twelve hours. The reason for the delay is that although the oxide layer is porous, it takes time for the fluid to wick its way through.

Once that’s done, get the very best six point socket you can find onto the fastener, make sure it’s sitting square, and get the breaker bar out. Grunt time. Use a soft-faced hammer on the handle of the breaker bar as well if you have to.

Screws are a similar story – use the best screwdriver available (or use an impact driver if you have one). Before unscrewing, you can tap the head of the screw down with a hammer to break the rust around the thread. You can use a wrench on the shaft of the screwdriver for more torque if the shaft has flats.

Once the rusted fastener is off, throw it away. It’ll rust itself straight back on again in five minutes if you re-use it.

Getting rounded or burred fasteners off. First: avoid. Get the wrench on straight and true before you apply torque. If it’s already burred beyond a socket, try using vice-grips clamped on so tight that they leave lines carved into the metal. If that doesn’t work, file or grind flats into what’s left of it and try using a crescent wrench. Hopeless cases will have to be cut off, ground off, or drilled out, and then (if you’re lucky) it will be possible to use a re-tap the thread or use a thread repair coil on the gaping hole where a screw used to be. I’ve never used E-Z-Outs, so can’t comment on them.

Once the burred fastener is off, throw it away. Really. They’re even worse than rusted ones. Messed up fasteners don’t heal, and you might have to take whatever it is apart again.

Keep a stock of fasteners. I’ve found that the temptation to put a bad fastener back on disappears completely if you have a replacement to hand. The hardware shop is good for short numbers. If you’re after more than a handful, internet warehouses like RadioSpares or Element14 do bags of 100 for half the price of OTC shops, with the same quality or better. Keep tabs on what you’re using and drop some money on a range of fasteners so that you have a spares bank ready and waiting.

If the manual says to use Loctite, use Loctite. Don’t think that a lock washer, or just tightening the bolt up good and hard, is going to work. There’s good reason this stuff is specified and even though it might be a hassle and a delay, go and get the correct grade of Loctite and use it. I had to have a motorcycle trucked home once because I ignored this, don’t let it happen to you.

Keep a stock of lubricants. A can of CRC5.56 and the top-up oils for my bike and car are the basics, and it’s amazing how many jobs can be sorted out with that combination of lubricants. I bought a tube of bearing grease about twenty years ago. It’s still with me and still being used. Beyond that, it’s best to buy purely as you need.

Keep a stock of rags. Old clothes and towels are a great source of workshop rags. It is possible to buy these, but it’s usually at a high price. Rags are for more than just cleaning dirt and oil off – they’re good for stuffing into holes so that loose bolts don’t fall into crank cases, or wrapping around individual parts before transport.

Get a high-quality bike floor pump with a pressure gauge. This is about the only individual tool I’d recommend you buy – frankly I think one of these should be in every garage, full stop. It’s that good. It takes all of ten minutes to go around the car and the bike with mine every fortnight, and the pump paid for itself in fuel and tyre savings in just a couple of months.

Get permanent mains-powered lighting. This sounds obvious, but it’s surprising how many garages out there don’t have this. It’ll take a day or so to set up and it will justify the expense and the effort the first time you use it.

Paint or line your garage walls and floor. The typical garage in New Zealand has an unpainted, unscrubbed concrete floor and one-layer walls held up with exposed timber joists. The roof is the same, with black builder’s paper as the normal interior surface. This means that the place is a black hole, literally. No matter how many lights you put up, you’ll be peering into the shadows for every job.

An old photographer’s trick is to work in a white-painted room with rounded corners. This provides soft, shadowless light over the full sphere of illumination. Getting your work area set up this way will take a couple of days, but it will absolutely transform the working experience.

Mopping up spills. Kitty litter (or sawdust) and a brush and pan is what works best on concrete floors, particularly if you’re dealing with oil or brake fluid.

Drying things. Get a domestic dehumidifier and put it into a closed room with whatever you want dried. There’s no fire or damage risk, like there is with a fan heater or similar, and the electricity bill is a lot lower. It will take a little while to work, but it’ll dry right into the corners of the room. For the best effect, aim the dehumidifier’s fan at whatever you’re drying out.

Buy towels. Specifically, white, fluffy bath towels. These are brilliant for placing under vehicles to collect dropped screws (amazing how these scoot into corners when dropped on concrete), protecting paintwork on vehicles, and for throwing a bit more light into the undersides of things.

They are also an absolute must if doing delicate disassembly of items like cameras. Go for something relatively cheap and don’t worry about oil stains and dirt. Treat these as relatively cheap consumable items, just make sure you work with something different to what you use in the house.

Go to a safety shop. The items that you will need, time and time again, are safety glasses, work gloves, overalls, earplugs or earmuffs, and possibly respirator masks. Vehicles come and go. Bodies don’t. If you screw yourself up doing a job, it’ll stay with you for a long, long time… it’s a lot cheaper and better to just buy the gear and have it to hand for when you need it.

Wash your car or bike battery once a year. Yes, I know it sounds ridiculous. The reason for this is that dirt has a habit of settling on the casing. It doesn’t take much electrolyte getting past the battery seals – or even just salt on the wind and atmospheric humidity – to make a very slightly conductive direct short circuit on the battery itself. This trickle discharge won’t kill your battery unless it really is filthy, but it will shorten the battery life. On a similar note, if you ever dismount a battery and set it down, never leave it on concrete. Set it aside on wood instead. Concrete is surprisingly conductive and will flatten a lead acid cell to the point of permanent damage in a few weeks.

Test your car or bike battery once a year. The way to do this is to have a dc voltmeter on the terminals when you start the engine. A good cell will maintain a high fraction of its no-discharge voltage while under maximum loading. A bad cell won’t. Typical figures I’ve found doing this test are 12 – 14V while running, 11 to 13V cold, 8 – 10V while cranking, and 6V or less indicating that the battery is nearing the end of its life.

The reason for taking this precaution is that when a battery finally dies, you’ll have one or two dodgy starts where it-just-makes-it… and after that it won’t. It’ll turn the motor over but there won’t be enough oomph left for a decent spark, then turning the motor over takes what little charge is still being stored in the battery, and after that you’re walking. Avoid.

Why do your own mechanics?

Why work on vehicles yourself?


Most people don’t, these days. Modern cars and motorbikes have become complex machines, requiring a large garage of specialised and expensive tools, together with extensive networks of supply chains for parts. One of the truly great things about dropping the car off at the local garage is being able to access all of these for far less than the cost of setting any of it up yourself, and knowing that your vehicle will be turned over and ready to go in a couple of days, or maybe even a few hours.


And most modern vehicles don’t need more than regular cleaning, oil and water topups and changes, and batteries and tyres every now and again anyway. So why worry about it?


Well, my situation is unusual: I own a relatively simple, easy to work on car and motorcycle. That means that I have a choice. That’s unusual enough. Most people, particularly most single people, only have one car. No down time can be tolerated. I am in the position where I can have one vehicle in bits for weeks or even months, while I happily get around in or on the other. Secondly, my interest in my vehicles isn’t like the average. To most people, a car is just a car. It’s an appliance that you get around in and not much more. It’s not a part of who you are, it’s not a statement that you make, or any such extravagance. It’s just practical, with maybe some style on top. Working on such a car is just another chore, and if it can be put off, then people do.


I deliberately chose impractical vehicles for purely emotional reasons. I want to look at my bike or my car and think: that’s mine. And I want them to look good, I want them to run perfectly, I want every moment using them to be a joy.


A mechanic’s incentive is to turn a job over as fast as possible, as cheap as possible, to get paid and to turn a profit. My motivation is to get the job done right.


I’d imagine there’s a few people out there who feel the same, but if that isn’t the case with you, here are some other reasons to start doing jobs on your vehicles:


  1. You save enormous amounts of cash by doing this over the long term. You won’t at first – purchasing tools and supplies is expensive when you’re starting out – but keep going, for years or decades, and the savings add up.
  2. You will find that vehicles can go for longer or much longer. Working on them yourself means that you see everything. Minor problems will tend to be sorted out a long time before they become major problems. This means that the interval between vehicle changes lengthens. The resale or trade in value on your current ride stays up. This can also add up to significant savings over the long term.
  3. Having the skills means that it becomes possible to buy a neglected but fundamentally good car at a low price. Some fixing, some parts, and you can have a good car for far less than you’d pay in the open market for a vehicle of the same quality.
  4. You learn about vehicles when you do this. You learn what to look for when you go buying the next one, too.   You learn where to shop, where to buy parts, who to ask advice of, what tools to trust and which to avoid.
  5. Being able to do this work yourself gives you options that people who rely on mechanics simply don’t have. I could buy an aging Ducati, because I could sort issues out myself instead of being bankrupted if things went wrong. I could run a race bike, if I wanted. And so on… one day I would like to own a Ferrari. Ten years ago I wouldn’t have dared to even dream of it. It’s very nice to be able to choose.
  6. I want my ride to run perfectly. That means time, being fussy, paying tight attention to detail. I’m not going to get that at a mechanic’s shop in the same way that I would if I do the work myself.
  7. I don’t like being helpless. I don’t know anyone who does. Having to go and pay someone to sort out problems – and having to blindly trust what they tell you – is not a position of power. Knowing what to do, how to do it, and being able to do it yourself, is.
  8. There’s someone who can get things done. It might not be what you’re into yourself, it might not be something you’d want to do, but nonetheless: this person commands respect. Your respect. Even if you don’t personally like them, or trust them, you still respect them. If you can get things done, then it’s you commanding the respect. This is an incredible social advantage that can help you a long way from the garage at home.
  9. Meeting your neighbors. I have found that working on classic or semi-classic vehicles out on the driveway or in an open, accessible garage is a fantastic way to meet people in my neighborhood.
  10. It speaks for itself really.


It can go wrong. I’ve certainly had my share of jobs that went over budget or over time, or the fault was found, the machine was put back together, and then something else promptly went wrong. It happens, and you get pissed off with it, and then you get on and sort it out. The important thing in this is to start small, to learn as you go, and to know when to down tools and just take it easy for a while.


Don’t work angry. Don’t work in a hurry to meet a deadline. Don’t work tired, late, missing sleep. Not if you can help it. Schedule jobs ahead, order parts in advance, get tooling and the work area sorted out before taking things apart, and you’ll find that it starts becoming a joy to make your ride go better.

Introduction

Lately I’ve been getting into fixing things.  I have an old motorbike, an old car, and an aging collection of film cameras.  I love them all.  I don’t have the spare cash for mechanics, and I’m fussy about results, so it makes sense to learn how to work on them.

I like to sort things out myself.  I like to understand how things work and why a machine is set up the way it is.  I also like to design new goodies, play with my own ideas, to test things out in the real world. 

I’m starting to find out quite a bit.  I also like to share!  It seems a shame to put in hours of work and then not tell people.  I’ve had the opportunity to use the Internet as a resource, it’s nice to put something back in.

Making things work again!